How to Start a Cooking Class Business: Recipe for Success
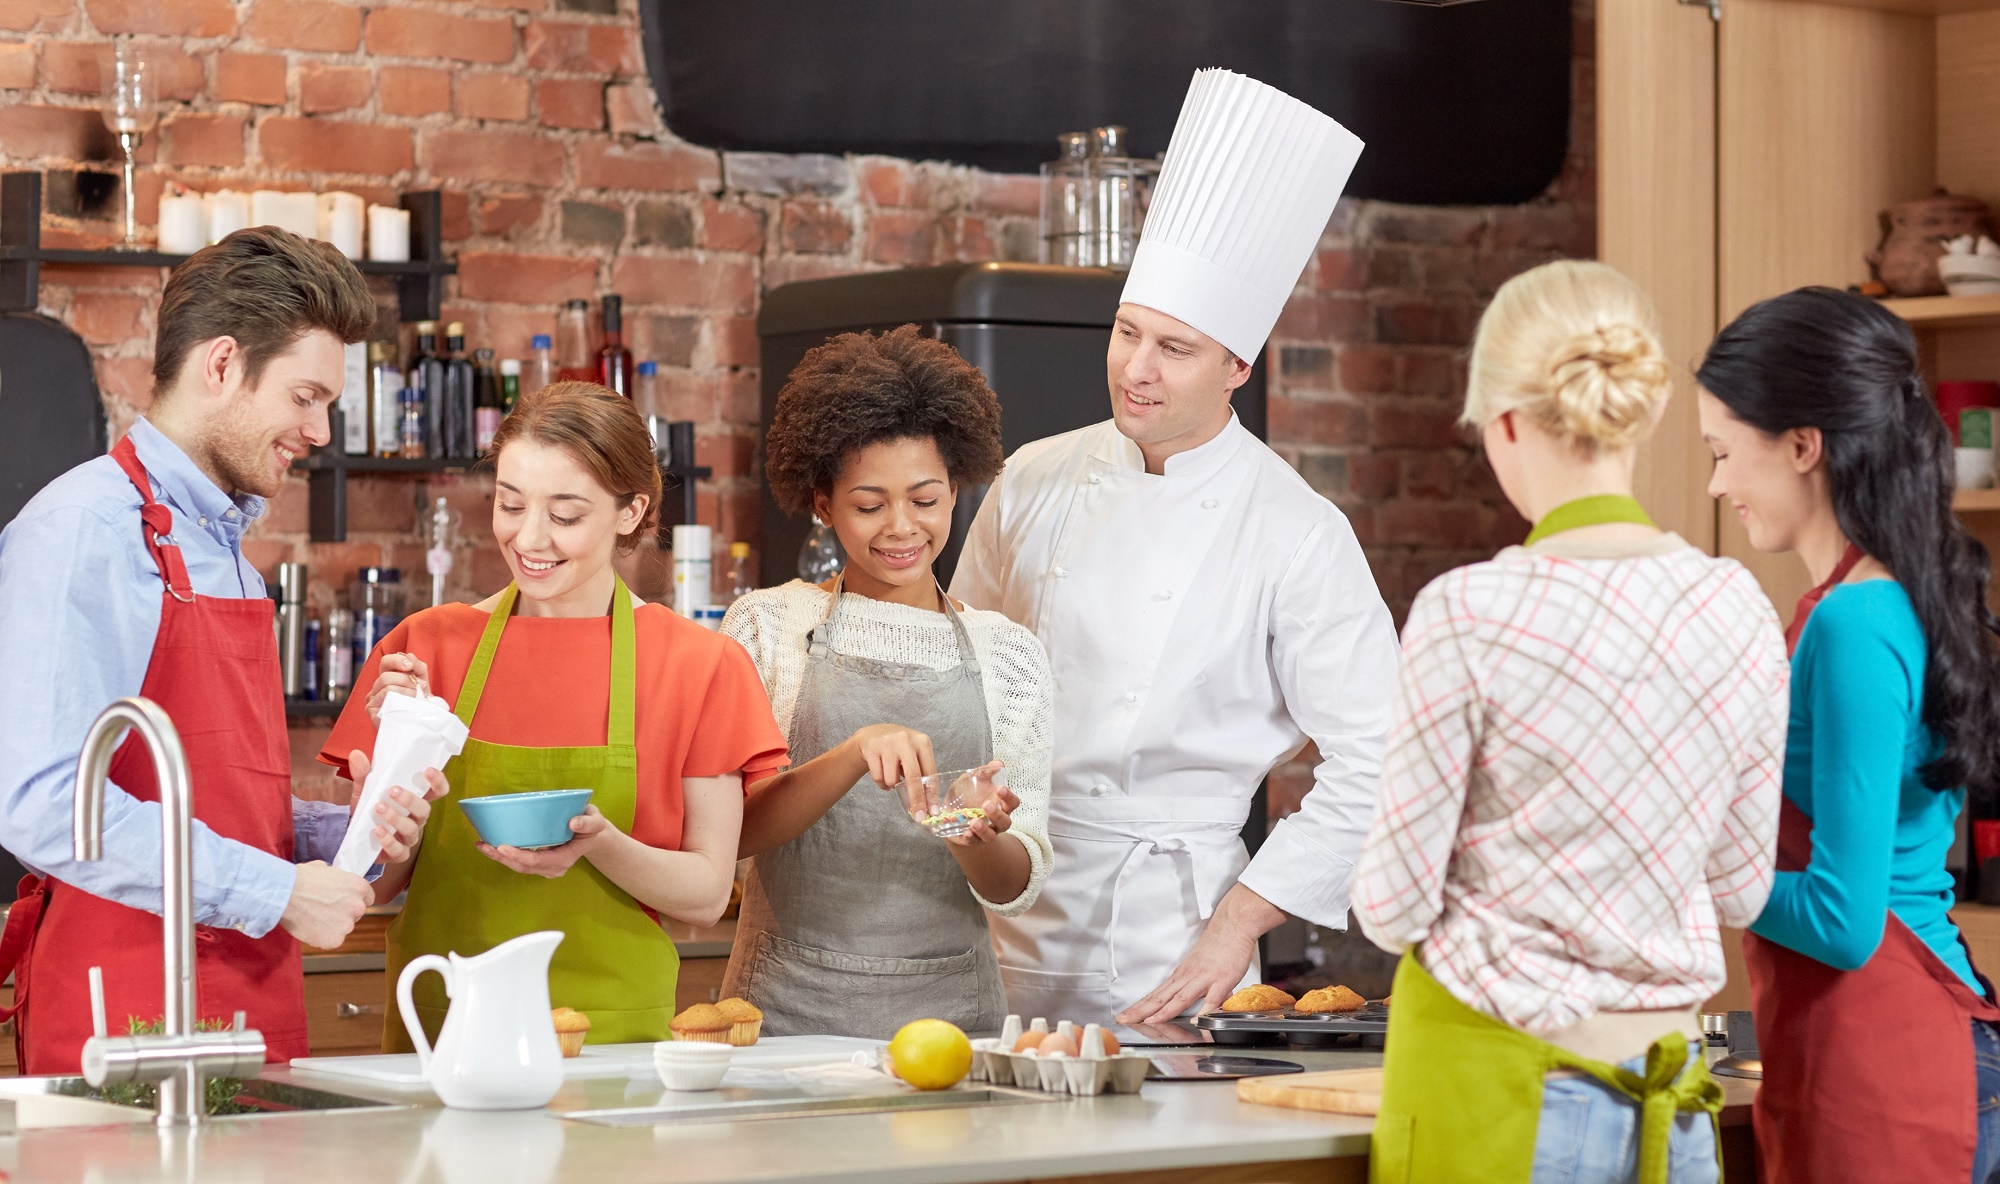
For many people, cooking isn’t just a skill; it’s a passion, an art, and a business waiting to happen. In the past few years, cooking classes have changed from weekend hobby workshops to full-blown experiences that are great for everyone, from novice home cooks to daring foodies and even corporate teams looking for a new way to build their team.
There is a big market for interactive, hands-on culinary learning because food-based content is becoming more popular on social media and people are becoming more interested in health, sustainability, and global cuisines. And that need makes it possible for you to start your own cooking class business, which is a great chance.
Starting a cooking class business can help you turn your love of food into something useful and profitable, whether you’re a professional chef with years of experience or a talented home cook who wants to share your skills. There are more ways than ever to connect with eager learners who want to learn something new, from small in-person workshops to online formats that can grow.

In this guide, we’ll tell you everything you need to know to start a cooking class business, such as:
- Picking your niche and ideal students
- Making classes that are fun and fit the skills of the students
- Securing space, permits, and legal protection
- Getting people to sign up for your classes and managing the bookings
- Making events and product add-ons that are useful for a long time
You will have the tools you need to launch with confidence, teach well, and grow in a way that lasts by the end.
Are you ready to find your taste in this field? First, let’s narrow your focus to the right group of people and type of food.
Step 1: Choose Your Niche and Audience
Not all cooking classes are created equal, and that’s a good thing. When you’re learning how to start a cooking class business, one of the first and most important decisions is who you’re teaching and what kind of cooking you’ll focus on. Defining your niche isn’t just a creative decision; it’s a business strategy.
A niche helps you stand out in a competitive market. It gives you clarity in your marketing, pricing, and curriculum planning. Instead of trying to be everything to everyone, you can become the go-to expert for a specific audience or skill set.
Popular Cooking Class Niches
- Beginner Home Cooks: Focus on kitchen basics, knife skills, and simple meals. Ideal for young adults or people living on their own for the first time.
- Couples or Date Night Classes: Hands-on cooking paired with wine, music, and a romantic atmosphere.
- Kids and Teens: Fun, age-appropriate classes that teach kitchen safety, snacks, or baking basics. Often tied to school holidays or weekends.
- Tourist-Focused Classes: Travelers love learning how to cook local dishes. If you’re in a city with a strong tourism market, this can be a goldmine.
- Special Diets: Vegan, gluten-free, paleo, or allergen-aware classes cater to health-conscious communities and niche dietary needs.
- Ethnic or Regional Cuisine: Thai street food, French pastries, and Mexican home cooking, offering authentic cultural experiences, is a huge draw.
- Baking and Pastry Arts: Bread, cakes, macarons, and desserts attract serious hobbyists and weekend learners alike.
Understand Your Ideal Student
Once you know your niche, think about who’s most likely to attend:
- Are they parents? Professionals? Retirees?
- How much experience do they have in the kitchen?
- Are they looking to learn, to socialize, or both?
- Do they want quick weeknight meals or multi-course fine dining techniques?
The more specific you can get about your ideal student, the better you can shape your marketing, messaging, and experience.
Research Your Local Market
Check out local competitors. What kinds of classes are being offered near you? What do they cost? Are they full or struggling to fill spots?

Use tools like Google Trends, Meetup, Eventbrite, and Yelp to see what’s working in your area. You can even run a survey or start an Instagram page early to gauge interest before you launch.
Remember: picking a niche doesn’t mean you can’t expand later, it just means you’re starting strong and focused.
With your niche chosen, it’s time to start building the heart of your business: your curriculum.
Step 2: Develop Your Curriculum and Class Format
Once you’ve defined your niche and audience, it’s time to map out what you’ll teach and how you’ll teach it. Your curriculum is the core product of your cooking class business. It’s what sets expectations, shapes the student experience, and helps you build repeat attendance through well-structured progression.
Your goal is to create classes that are engaging, clear, hands-on, and outcome-driven. Whether you’re running one-off workshops or long-term series, your students should walk away with tangible skills and confidence in the kitchen.
Decide on Your Class Format
There are several ways to structure your offerings, depending on your goals and audience:
- One-Off Workshops: Great for date nights, corporate events, or fun “experience” seekers. These stand-alone sessions focus on a single dish or theme, like handmade pasta or sushi rolling.
- Progressive Courses: Multi-week or monthly series that allow students to build skills over time. This is ideal for serious learners or those preparing for culinary careers.
- Seasonal or Themed Classes: Holiday baking, summer grilling, or farmers’ market cuisine, these offer urgency and excitement around specific times of year.
- Private or On-Demand Classes: One-on-one instruction or small group bookings for birthdays, anniversaries, or team building. Often higher priced.
For each format, define a clear outcome. For example:
“In this 2-hour class, students will learn to make handmade fettuccine from scratch, create a seasonal sauce, and master basic pasta dough techniques.”
Outcomes like these help with marketing, student confidence, and repeat enrollment.
Hands-On vs. Demonstration Style
Some classes are fully hands-on, where each participant has their own station and ingredients. Others are more demonstration-based, where the instructor cooks in front of the class with limited student participation.
Hands-on classes offer deeper learning and better engagement, but require more space, staff, and prep. Demo-style classes can accommodate larger groups and work well in community centers or pop-up formats.
You can also offer hybrid formats: a demo followed by guided student practice, or stations where groups rotate through different techniques.
Build Sample Class Outlines
Each class should include:
- Welcome and introduction (5–10 mins)
- Instruction and demonstration (20–30 mins)
- Hands-on cooking (30–60 mins, depending on dish)
- Tasting and Q&A (15–20 mins)
- Clean-up and takeaway materials (recipe cards, tips)
Create outlines in advance so you can deliver consistently and confidently every time.
Strong curriculum design leads to positive reviews, word-of-mouth referrals, and students who return hungry for more.
Now that you know what you’ll teach, it’s time to handle the practical side of running a food-based business, starting with licenses and legal protection.
Step 3: Get Licensed and Insured
Starting a cooking class business means working with food, people, and often commercial spaces, all of which come with legal responsibilities. Whether you’re teaching from a home kitchen, community center, or professional studio, getting your licenses and insurance in place ensures your business is legit, protected, and trusted.
Skipping this step might save time in the short term, but it can lead to fines, shutdowns, or lawsuits down the road. Here’s what you need to cover.
Choose a Business Structure
Start by choosing a legal structure for your cooking class business. Most solo instructors and small teams choose one of these:
- Sole Proprietorship: Easiest to set up and manage, but offers no personal liability protection.
- Limited Liability Company (LLC): A popular option for small businesses that want to protect personal assets while keeping taxes manageable.
- Corporation (S-Corp or C-Corp): Suitable for businesses planning to scale or take on investors.

You can usually register your business name and entity through your state’s Secretary of State website.
Register for an EIN
The Employer Identification Number (EIN) from the IRS is essential for filing taxes, opening a business bank account, and hiring staff (if you plan to). It’s free and can be obtained in minutes through the IRS website.
Food Handling and Safety Certifications
Because you’re working with food, you may need to meet local health and safety requirements. Depending on your location and setup, this could include:
- Food Handler’s Permit (required for instructors and staff)
- ServSafe Certification (widely recognized for food safety training)
- Health Department Inspection (if you’re operating out of a commercial or shared kitchen)
If you’re using a third-party kitchen, ask if it’s already licensed and inspected, they may cover some of these requirements.
Business Insurance for Cooking Classes
To protect yourself and your students, you’ll need at least the following:
- General Liability Insurance: Covers injuries or damages during class.
- Product Liability Insurance: In case someone gets sick from the food you prepare or ingredients you provide.
- Professional Liability Insurance: Covers instructional errors or miscommunication.
- Property Insurance: If you own or lease physical space and equipment.

Many insurers offer tailored packages for cooking schools and culinary instructors, so it’s worth working with a provider familiar with food-based businesses.
Waivers and Release Forms
Students should sign a liability waiver before participating in hands-on classes. This helps protect you from responsibility for minor injuries, burns, or allergic reactions, though it doesn’t replace proper insurance.
You may also want students to sign photo or video releases if you plan to use class footage for marketing.
Getting licensed and insured may not be the most exciting part of starting your business, but it gives you, and your students, peace of mind. With the paperwork in order, it’s time to focus on where the magic happens: the kitchen.
Step 4: Find the Right Kitchen Space
Your kitchen is more than just a place to cook, it’s where your students learn, interact, and experience your brand firsthand. Choosing the right space is a major factor in the success of your cooking class business. It affects how many people you can teach, how immersive the class feels, and whether you meet local health and safety regulations.

Luckily, you have several options depending on your goals, budget, and target audience.
Home Kitchen (with Caveats)
If you’re just starting small and offering private or virtual lessons, teaching from your home kitchen might seem convenient. But there are a few things to consider:
- Most cities have zoning laws that restrict food businesses in residential areas.
- Your kitchen may need upgrades to meet commercial safety standards.
- You’ll likely need additional liability insurance and written permission from your landlord or HOA, if applicable.
- It may limit your ability to scale or host larger classes.
That said, some instructors do successfully run small group lessons from home, especially in rural or unregulated areas. Just make sure you’re covered legally and insured properly.
Commercial Kitchen Rentals
Many cities offer shared-use commercial kitchens or culinary incubators designed for startups and food entrepreneurs. These spaces:
- Are already licensed and inspected
- Can be rented by the hour or month
- Come equipped with professional-grade appliances
- Are often centrally located and accessible
They’re ideal for hosting hands-on classes without the cost of building your own facility. Some even offer classroom seating or multi-station setups.
Community Centers, Schools, and Event Spaces
If you’re running beginner or demo-style classes, consider spaces like:
- Community centers
- Local schools (especially culinary programs)
- Church kitchens or nonprofit event halls
- Wineries, breweries, or coworking spaces
These venues may already have usable kitchens and are often more affordable to rent than private studios. They also come with built-in foot traffic and marketing opportunities.
Your Own Studio Kitchen
If you’re going big and envision your cooking class business as a full-time venture, investing in a dedicated kitchen studio gives you full control over your branding, layout, and schedule.
Key things to plan for:
- Workstations: At least one per 2–4 students, depending on format
- Ovens, stovetops, and prep space
- Ventilation and fire safety systems
- Wash stations and sanitation areas
- Storage for ingredients, utensils, and teaching materials
- Seating for tastings, demos, or discussions
A studio space is more expensive to build and maintain, but it can pay off through long-term rentals, branded events, and flexible scheduling.
No matter what space you choose, always factor in cleanliness, accessibility, lighting, and equipment availability. A well-thought-out kitchen space is the foundation for confident teaching and satisfied students.
With the location secured, it’s time to figure out how much to charge, and how to make your classes financially sustainable.
Step 5: Set Pricing and Payment Options
Pricing your cooking classes isn’t just about covering your costs, it’s about communicating value. The right price point tells potential students what kind of experience to expect and helps you build a sustainable business. Whether you’re teaching beginners how to boil pasta or guiding seasoned foodies through regional Thai cuisine, your pricing should reflect your expertise, class structure, and operating expenses.

Here’s how to set rates that make sense, for both you and your students.
Know Your Costs
Start by calculating all the expenses involved in hosting a single class. These may include:
- Ingredients and recipe testing
- Kitchen space rental or utilities
- Staff wages (if you have assistants)
- Cleaning supplies and sanitation products
- Cooking tools and equipment
- Marketing and booking fees
- Your time and expertise
Once you know your cost per class, add a profit margin that reflects the value you bring. Many cooking class businesses aim for at least a 30–50% markup after expenses.
Common Pricing Models
There’s no one-size-fits-all approach, but these models are common:
- Per Class Fee: A fixed price for one session, often ranging from $40 to $150 depending on the length, format, and cuisine.
- Bundle Packages: Discounted multi-class passes (e.g., 4 classes for $300). Great for ongoing students and increasing lifetime value.
- Membership Model: Monthly or seasonal memberships with unlimited classes or access to exclusive content. Best for loyal, long-term clients.
- Private or Corporate Rates: Premium pricing for one-on-one instruction, birthday parties, or company team-building events. These often range from $300 to $1,000+ depending on group size and customization.
Factors That Affect Pricing
- Niche or specialty: More complex cuisines or dietary-specific classes (e.g., vegan gourmet, gluten-free baking) can command higher fees.
- Skill level: Beginner classes may be more affordable and attract volume. Advanced or niche techniques should be priced higher.
- Experience and reputation: If you’re a professional chef or have a culinary background, that justifies a premium.
- Location: Urban centers can support higher price points than rural or small-town areas.
- Inclusions: If your fee includes full meals, wine pairings, recipe cards, or take-home kits, make sure to reflect that in your pricing.
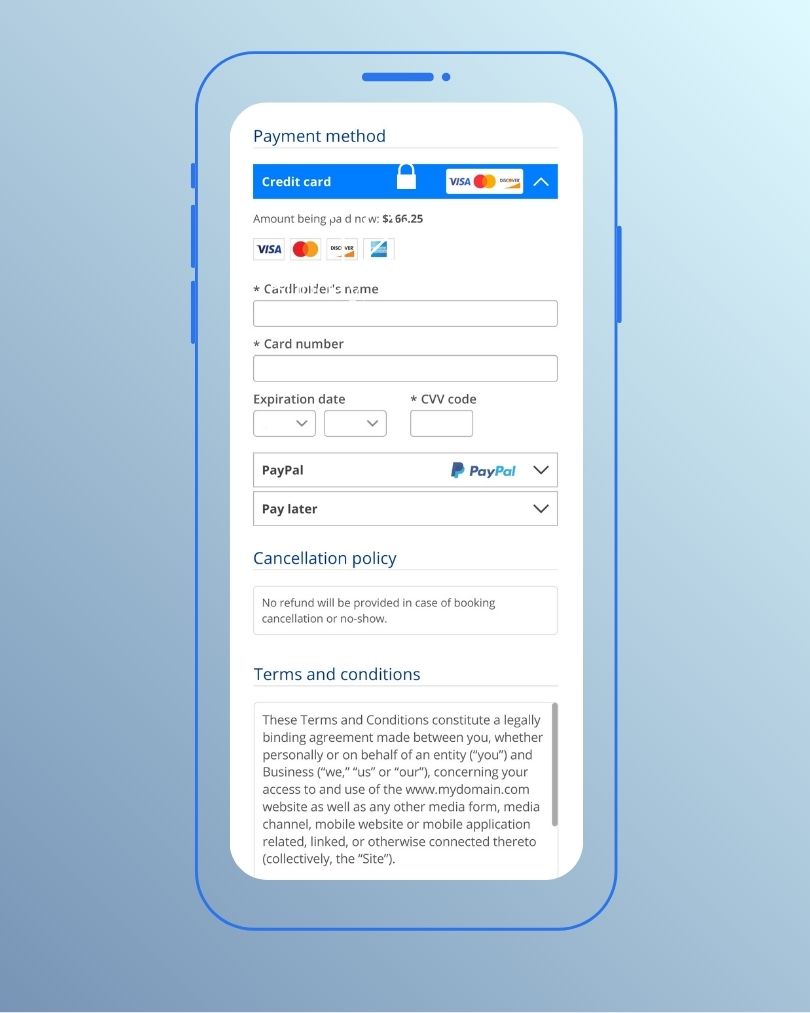
Accepting Payments
Make it easy for students to pay and book by accepting:
- Credit/debit cards
- Digital wallets (Apple Pay, Google Pay)
- Gift cards or e-vouchers
- Pay-later platforms like Afterpay (optional)
Ensure that your booking platform supports secure online payment processing, so you don’t have to chase invoices or handle cash.
Transparent pricing builds trust, and streamlined payments reduce friction at checkout. Once your pricing is set, it’s time to make booking just as effortless.
Step 6: Set Up Scheduling and Online Booking
If there’s one thing modern customers expect, it’s convenience. Whether they’re booking a haircut, reserving a table, or signing up for a cooking class, they want the process to be fast, simple, and mobile-friendly. As a cooking class business owner, setting up an easy-to-use scheduling and booking system isn’t just helpful, it’s essential.

Manual signups through email or social media can quickly become a nightmare. Double bookings, lost messages, no-shows, and payment confusion are all signs that you need a better system in place.
Why Online Booking Matters
Offering online scheduling improves your business in several ways:
- Saves time: No more back-and-forth DMs or chasing down confirmations
- Reduces no-shows: Automated email/SMS reminders keep attendance high
- Improves cash flow: Secure payment upfront means fewer cancellations and last-minute dropouts
- Boosts customer satisfaction: Students can view availability, choose class types, and pay in minutes
Features to Look for in a Booking System
Your scheduling software should support the specific needs of a cooking class business.

Look for a tool that offers:
- Real-time calendar management
- Class capacity control (limit seats based on space or equipment)
- Recurring class options (for weekly series or monthly themes)
- Waitlists for full sessions
- Automated reminders via email or SMS
- Payment processing and deposit options
- Promo code or gift card support
- Mobile-friendly booking interface
Class scheduling platforms like Bookeo are ideal because they’re designed for experience-based businesses like yours. With Bookeo, you can create class listings, manage student rosters, sync calendars, and collect payments, all from one dashboard.
Simplify Your Workflow
A good booking system doesn’t just help your clients, it frees up your time. Instead of juggling spreadsheets, texts, and payment apps, you can focus on what matters: teaching great classes and building your brand.
Set your system to block off holidays, include prep time between classes, or allow students to reschedule within a specific window. The more control you have behind the scenes, the smoother your business will run.
Bonus: Sync With Your Marketing
Link your booking page directly from your website, email newsletters, and social media bios. Make “Book Now” buttons a standard part of every campaign, post, or announcement. Fewer clicks means more conversions.
Once your class calendar is live and easy to access, your next focus should be filling those spots with eager learners.
Step 7: Market Your Cooking Class Business
You’ve chosen your niche, developed an exciting curriculum, priced your classes, and set up a seamless booking system. Now comes the real test: getting people to sign up. Even the best cooking class in the world won’t thrive without consistent and creative marketing.

Whether you’re starting from scratch or already have a small following, your goal is to attract new students while keeping current ones engaged and returning. Here’s how to build buzz and grow your cooking class business.
Create a Strong Online Presence
Your website should serve as your digital storefront. Make sure it includes:
- A clear description of your classes and teaching style
- A class calendar with real-time availability
- Easy access to your booking system
- FAQs covering ingredients, allergies, cancellations, and what students should bring
- Testimonials or reviews from past students
- High-quality images of your classes, food, and kitchen environment
If you’re offering multiple types of classes, categorize them clearly (e.g., beginner, date night, vegan, baking).
Build a Social Media Strategy
Cooking content is tailor-made for social platforms. Use Instagram, TikTok, and Facebook to:
- Post short videos of food being made in class
- Share student highlights and user-generated content
- Offer cooking tips or mini tutorials
- Announce new classes, seasonal menus, or last-minute openings
- Use location tags and trending hashtags to boost visibility

Video performs best, especially quick, visually appealing reels or time-lapses of class moments. Don’t be afraid to show your personality. People want to learn from someone relatable and passionate.
Partner With Local Businesses
Forming partnerships can help you expand your reach quickly:
- Work with local wineries, farms, or specialty grocers to co-host events or supply ingredients
- Team up with coworking spaces or fitness studios for wellness or lifestyle-themed classes
- Offer cooking demos at farmers’ markets or food festivals to promote your brand
- Collaborate with food influencers or bloggers who can attend your classes and share the experience
Many small businesses are open to cross-promotion, especially if you share a similar audience.
Use Email Marketing
Make a simple email list and start getting contacts right away. Send updates on a regular basis about:
- Upcoming class schedules
- Last-minute openings
- Seasonal recipes
- Exclusive discounts
- New products or events

Email helps keep your brand in people’s minds, especially for students who have already attended and might go back again.
Incentives and Promotions
Early promotions can create momentum and fill your first few classes:
- Discounts for “bring a friend”
- Free or discounted first class for people who sign up for the newsletter
- Referral rewards (i.e., free apron or 10% off a future class)
- Programs that reward students who go to more than one session
These deals do more than bring in new people; they help you make a community.
Collect and Showcase Reviews
Ask happy students to leave reviews on Google, Yelp, Facebook, and your booking platform. Positive reviews are one of the most powerful tools for attracting new clients. Feature them on your website and in your marketing.
Marketing is an ongoing process, but every satisfied student becomes a potential promoter. Once you’ve built your base, it’s time to explore additional income opportunities beyond the standard class.
Step 8: Offer Packages, Events, and Add-On Income
It’s great to teach cooking classes, but if you only rely on ticket sales, you won’t be able to grow as much. To grow your business and make it more stable, think about adding new ways to make money that work well with your classes and give each student more value.
Offer Private Events and Group Packages
Hosting private or themed events is a great way to get new people to come and make more money per session, for example:
- Birthday parties (for kids or adults)
- Couples’ date nights with a romantic twist
- Corporate team-building events that blend food and fun
- Bridal showers or bachelorette classes with personalized menus
- Family-friendly holiday cooking sessions
You can personalize these packages with decorations, special menus, or gift bags and charge extra for the extra planning and exclusivity. To make the experience better, offer options like photography, printed recipes, or meals to take home.
Make a Series of Classes Based on The Season or a Specific Skill
In addition to one-time classes, you might want to offer bundled courses that follow a set learning path. For example, “Knife Skills to Kitchen Master” (4-week progression), “Holiday Baking Bootcamp” (seasonal focus), or “Around the World in 5 Dishes” (cultural cuisine themes).
Selling these as a series makes people more likely to buy them and increases the value of each customer over time. You can offer a discount for signing up in advance or upsell bonus content like recipe e-books or video guides.
Sell Branded Goods and Cooking Kits
- After class, students often want to make the dish again at home. Selling makes it easy (and profitable):
- Kits with pre-measured ingredients
- Spice mixes that are unique to you
- Binders or journals for custom recipes
- Branded cutting boards, utensils, or aprons
- Downloadable recipes, videos, or meal plans
You can set up a small store in your kitchen or sell things through your website or emails that confirm bookings.
Sending kits ahead of time can make online or hybrid classes more interesting and give students a more hands-on experience.
Collaborate With Brands
Collaborate with food companies, local farms, or kitchenware brands to provide sponsored tools or ingredients for the class. You could get free stuff, paid work together, or affiliate commissions.
You could also work with local breweries or wineries to host pairing nights, where you and a sommelier or brewer teach together for a full sensory experience.
Make Experiences That Can Be Given as Gifts
Make it easy for people to buy your classes as gifts:
You can sell gift cards for certain types of classes or for a certain amount of money.
Give away holiday gift bundles that include a class, a branded item, and a set of recipes.

During the holidays and graduation season, tell people to “give the gift of cooking.”
Experiences that can be given as gifts bring in new students and help you reach more people without having to do any extra marketing.
When you offer a wider range of services, you make it easier for people to get into your business and give your students more value. But none of it matters if the class is bad. Let’s look at how to make every class unforgettable.
Step 9: Build a Memorable Student Experience
Your curriculum might be well-structured, your kitchen spotless, and your recipes delicious, but what keeps students coming back (and bringing their friends) is the experience. From the moment they arrive to the moment they leave, every touchpoint should feel thoughtful, engaging, and personal. People don’t just want to learn how to cook, they want to feel seen, welcomed, and inspired.
Here’s how to create a student experience that sticks.
Start With a Warm Welcome
Set the tone right from the start. Greet students by name, offer water or tea, and make sure the space feels clean, inviting, and organized. First impressions count, especially for first-timers who may be nervous or unsure.
Consider:
- Playing soft background music to set the vibe
- Giving everyone a nametag to build comfort and connection
- Starting with a brief icebreaker or group intro to build rapport
You’re not just teaching a class, you’re hosting an experience.
Provide Thoughtful Takeaways
After class, give students something they can take with them, physically or emotionally. These don’t need to be expensive or elaborate, but they should reinforce what they’ve learned and create a sense of value.
Ideas include:
- Printed recipe cards or digital downloads
- Follow-up emails with bonus tips, variations, or ingredient sourcing links
- Certificates of completion for kids, teens, or multi-week courses
- Photo opportunities at the end of class (especially for group events or couples’ nights)
People love to share their experiences online, so make it easy and Instagram-worthy.
Collect Feedback and Use It
Ask for feedback after each class. It can be as simple as a 3-question card, a quick chat, or an automated email survey through your cooking class booking system.
- What did they enjoy most?
- What could be improved?
- What kind of class would they attend next?

Use this information to refine your curriculum, adjust your teaching pace, and even brainstorm new class ideas. Students will appreciate knowing their voices matter.
Build Community
People are more likely to return if they feel like they’re part of something. Encourage connection between students by:
- Creating a private Facebook group or email circle
- Offering early-bird access to new classes for repeat students
- Featuring returning students in your social media content
- Hosting “alumni” nights or multi-course events for past participants
This kind of community-building turns casual attendees into long-term advocates, and long-term advocates into your best marketers.
Pay Attention to the Small Details
It’s often the little things that people remember most:
- How your staff smiled and helped clean up
- How you remembered someone’s dietary restriction
- How the lighting made the food pop in every photo
Consistently delivering these thoughtful touches will set your cooking class apart from the competition.
Once your student experience is fine-tuned, everything else becomes easier, marketing, retention, reviews, and referrals all improve naturally.
Now, let’s wrap it all up and give you a final push to get your business started.
Conclusion
Starting a cooking class business isn’t just about recipes, it’s about creating an experience that brings people together, teaches valuable skills, and leaves a lasting impression. Whether you’re teaching pasta from scratch, plant-based meals, or regional specialties, your knowledge and passion can become a thriving business that serves your community, and grows with you.
In this guide, you’ve learned how to start a cooking class business from the ground up: choosing your niche, designing a curriculum, setting prices, securing space, managing bookings, marketing your classes, and expanding through events and add-ons. You now have a roadmap that can help turn your love of cooking into a meaningful, profitable career.
One final ingredient: simplicity. Tools like online booking software Bookeo take the stress out of scheduling, payments, and client management, so you can focus on what matters most: sharing your joy for cooking with others.
Whether you start with a handful of students or a packed kitchen, what matters is starting. The demand for food experiences is growing, and there’s never been a better time to share your skills.
Your kitchen is ready. Your students are waiting. It’s time to roll up your sleeves, and cook up a business you love.