
How to Add a Booking System to WordPress: A Step-by-Step Guide
Tired of juggling appointments through endless phone calls and emails? A well-laid-out WordPress booking system could revolutionize your business. You’ll save precious time, and we all know time means money, while keeping full control of your schedule.
Your customers will love how easy WordPress booking makes the process. They can check when you’re free, pick their services, and pay upfront, right from your website. Simple online booking forms automate the whole ordeal. On top of that, your clients won’t need to visit you just to book an appointment.
This automated scheduling gets more and thus encourages more bookings for businesses of every size. Whether you run a salon, consulting firm, or educational service, knowing how to add a booking system to WordPress will change how you handle appointments. In this piece, we’ll guide you through each step, from picking the right plugin to making your booking form work perfectly.
What is a Booking System in WordPress?
A WordPress booking system is a plugin that helps you manage appointments, reservations, and bookings right from your website. This specialized plugin creates a direct connection between your services and potential clients, eliminating manual schedule management.
The main purpose of a booking system is both simple and powerful. Your website visitors can check availability, pick services, and book time slots without having to contact your business directly. This automation changes the way service-based businesses work online.

The booking system has three main parts. You get online calendars that show when you’re free. Then there’s reservation forms to collect client details. The system also sends automatic email updates to keep you and your customers in the loop about upcoming appointments.
Most booking plugins blend naturally with your WordPress site. They create a user-friendly booking page that makes scheduling easy for everyone involved. The system stops double-bookings and keeps your business running smoothly in one place.
A good WordPress booking system needs these key features:
- Customizable booking forms that match your brand
- Calendar displays showing availability
- Online payment processing
- Automated email reminders
- Confirmation messages
- User-friendly interfaces for both admins and visitors
Quality booking systems also let you adjust scheduling options to match your business needs. You can set your work hours, mark holidays, and add buffer time between appointments.
The market has booking plugins for different industries. Service providers use appointment scheduling plugins, hotels use accommodation booking systems, travel companies prefer tour booking plugins, and event planners choose plugins for workshops or classes. Each type fits the unique needs of these sectors.
WordPress booking systems let your clients book services any time of day or night. This 24/7 availability can boost your booking numbers by a lot and help grow revenue.
Business owners save time when they pick the right booking plugin. The system sends automatic reminders to cut down no-shows and works with calendars and payment systems to optimize operations.

WordPress booking systems are adaptable to your needs. They work great whether you’re running a solo business or managing teams across multiple locations. A professional booking system also builds trust with clients who appreciate your well-organized approach to scheduling.
A WordPress booking system transforms reservation management. It turns a potentially messy process into a well-organized, automatic system that works better for everyone involved.
Why You Should Add a Booking System to Your Site
Save time and reduce manual scheduling
Managing appointments by hand takes up precious hours you could spend growing your business. A booking system automates your scheduling tasks and saves 1-2 hours every day. You can focus on what matters instead of getting buried in admin work.
A good booking plugin takes care of all scheduling details. It stops double bookings, handles cancelations, and keeps your calendar organized without you or your team’s constant attention. So this automation cuts costs since you don’t need extra support staff.

There’s another reason – it cuts down on scheduling mistakes. Manual booking often leads to errors like double bookings, forgotten appointments, or mixed-up times and services. An automated system fixes these problems and makes scheduling more reliable.
Improve customer experience and conversions
Today’s customers want everything to be easy. A booking system gives them exactly that – they can check when you’re free and book services without calling or emailing. This easy access makes customers happier and brings them back more often.
The numbers show it works – businesses using these systems see 30% fewer missed appointments. Why? The system sends email and SMS reminders to clients before their appointment time, which means fewer no-shows and better revenue.
Booking becomes more personal too. Clients can:
- Select their preferred services
- Choose specific staff members
- Pick convenient time slots based on real-time availability
- Provide only essential information needed for the appointment

These options let customers control their booking experience, which builds loyalty and satisfaction.
Enable 24/7 appointment booking
The best part about adding a booking system? It takes appointments all day, every day. Your booking system works while you sleep, letting clients schedule whenever they want.
The stats back this up – 89% of users want to book appointments anytime through online or mobile tools. This matches what modern customers expect – flexibility and instant service. It makes sense that 63% of service providers now let clients schedule themselves.
Having 24/7 booking helps businesses with international clients.
Choosing the Right Booking Plugin for WordPress
Finding the right booking plugin for your WordPress site depends on your business’s unique needs. Many options exist, and you should think about features that line up with your scheduling needs, customer base, and budget.
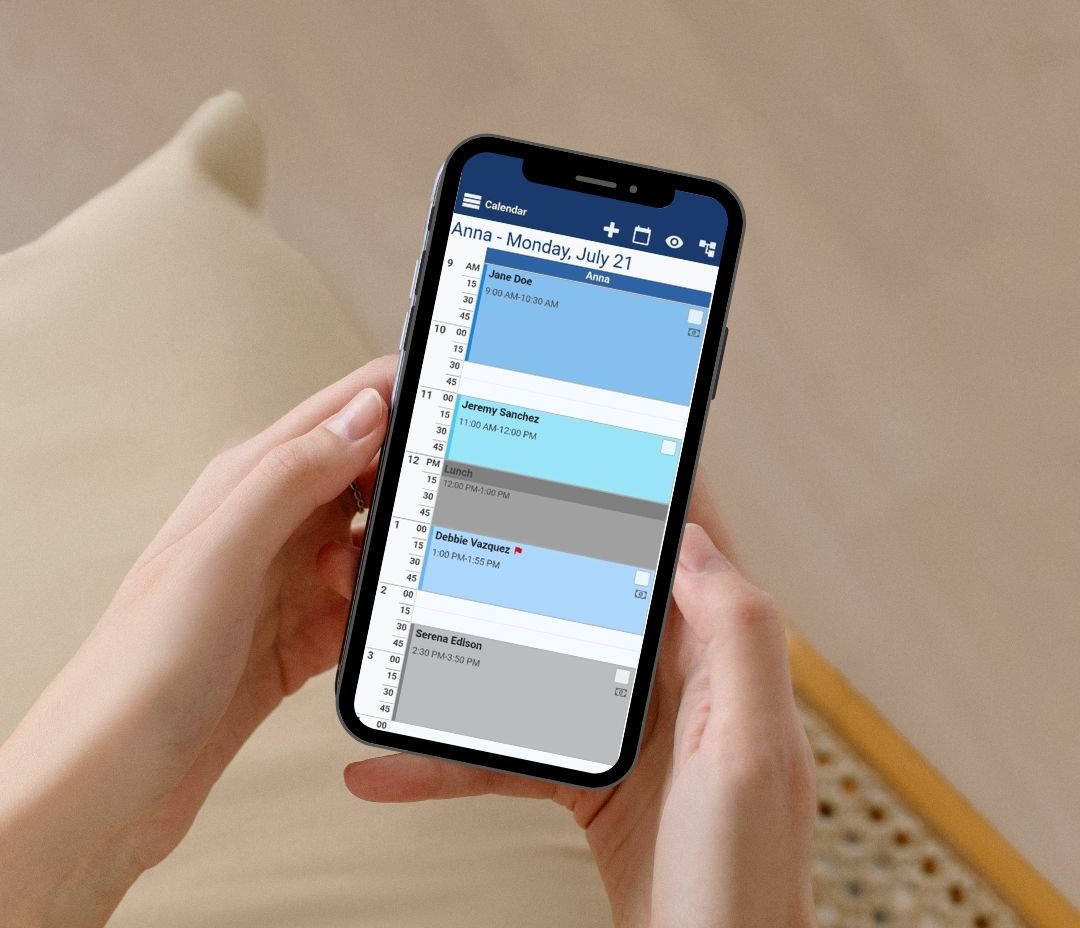
Bookeo: A powerful online booking plugin for WordPress
Bookeo gives WordPress users a complete online booking solution that works best for service-based businesses. The plugin helps manage appointments, handle payments, send reminders, and boost marketing efforts.
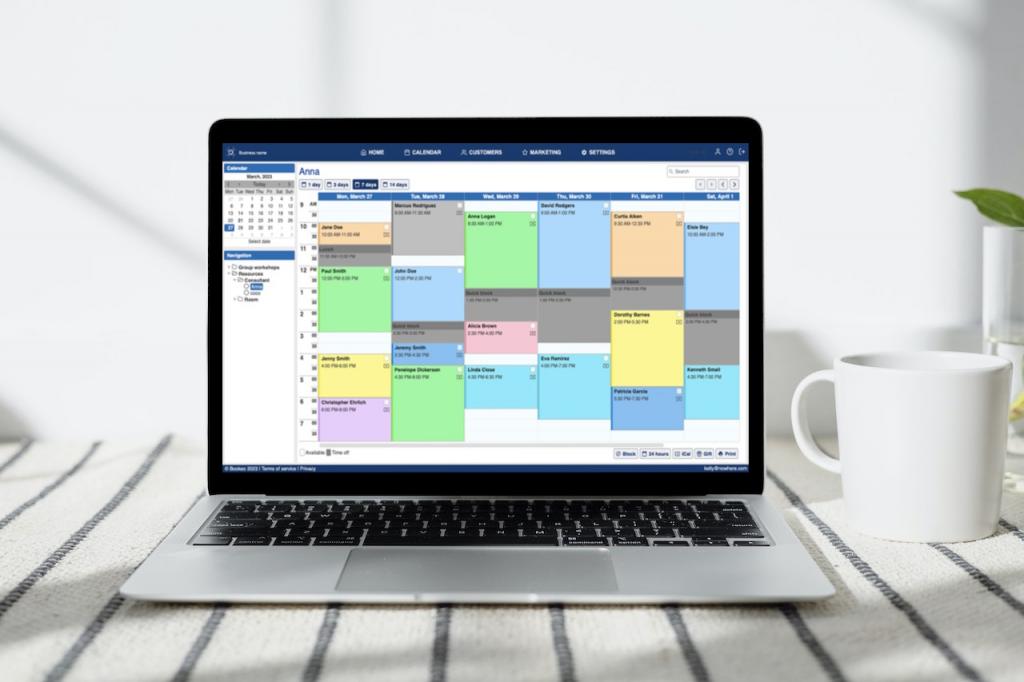
The system prevents scheduling conflicts and lets you customize the booking experience. Bookeo lets you:
- Take bookings on your WordPress site around the clock
- Keep your dashboard current with booking and payment information
- Track in-store and phone bookings along with online appointments
- Match your brand by adjusting colors, style, and fonts
- Work with popular tools like Mailchimp and GroupOn
Getting Bookeo running on WordPress doesn’t take much effort. Just download the plugin, set up your Bookeo account, and follow the setup steps. You can add it using Bookeo’s scheduling WordPress plugin or any plugin that lets you edit HTML.
The system helps thousands of businesses in more than 120 countries and supports over 35 languages. You can try Bookeo free for 30 days without entering credit card details.
Your choice should depend on what your business needs, how many staff you have, which payment methods you want, what kind of notifications you prefer, and which other tools you need to connect. The best booking plugin will grow with your business while staying easy to use for everyone involved.
Step 1: Install and Activate Your Booking Plugin
The right booking plugin sets up your appointment system properly. Let’s look at how to install and activate it on your website.
Where to find and install plugins
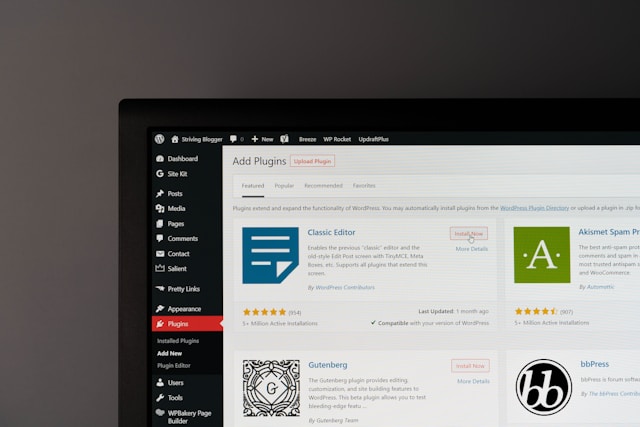
WordPress gives you several ways to add plugins. Your WordPress dashboard offers the quickest solution:
- Log in to your WordPress admin panel
- Go to Plugins > Add New in the left sidebar
- Type your chosen booking plugin name in the search field
- Click the Install Now button next to the plugin
- Click Activate once installation finishes
Manual installation might work better for some users:
- Get the plugin zip file from the WordPress directory
- Log into your WordPress dashboard
- Go to Plugins > Add New
- Click the Upload tab at the top
- Select Choose File and pick your downloaded zip file
- Click Install Now and then Activate
You can also extract the zip file and upload it through FTP to your server’s /wp-content/plugins/ directory. This helps if your dashboard has file size limits.
The plugin adds a new menu item to your WordPress admin panel after activation. This becomes your hub to manage all booking-related settings.
Free vs premium plugin options
WordPress scheduling plugins come with free and paid versions. You can test the features before you buy. Small businesses with simple scheduling needs often find free versions adequate.
Premium versions offer advanced features that lift your booking experience:
- Automated notifications – SMS reminders and email confirmations
- Payment processing – Online payments through various gateways
- Staff management – Multiple employee schedule handling
- Custom branding – Booking forms that match your website
- Priority support – Quick help for any issues
- Calendar integrations – Third-party calendar sync
Free versions let you review if the plugin meets your simple needs without spending money. Your growing business might need premium features to handle more bookings and complex requirements.
The installation stays similar for free and premium versions – search, install, and activate. The difference shows up in available features after activation.
The next step after installation involves setting up your plugin. You’ll need to add your business information, create services, and customize your booking form. We’ll cover these steps in the next sections of this piece.
Step 2: Set Up Your Business Details
Add company name, hours, and contact info
Accurate business information determines how well your WordPress booking system performs. You’ll need these essential details to help clients identify and book with your business:
- Business Name and Details: Enter your company name, description, and branding elements to make the booking experience personal.
- Operating Hours: Set your regular working hours for each day. These hours tell clients when they can book appointments.
- Service Information: Create services that customers can schedule through your booking system. Each service needs:
- Name and description
- Duration and pricing
- Time intervals between slots
- Staff Details: List your team members who provide services with their names, email addresses, and phone numbers.

Most plugins come with a setup wizard that guides you through each step. The core information stays the same across platforms even though interfaces differ.
Configure availability
You need to fine-tune your availability beyond regular business hours:
- Calendar Configuration: Choose your booking days and times. Most plugins have a visual calendar where you can:
- Block specific dates (holidays, vacations)
- Close certain hours on available days
- Create different hours for special dates
- Inventory Management: Set booking limits per time slot for services with capacity restrictions.
- Buffer Times: Leave space before or after appointments for preparation or cleanup.

The right business details setup creates a reliable booking system that shows your true availability and gives clients a seamless experience.
Step 3: Create Services and Assign Staff
Your WordPress booking system needs the right services and team members. This step will determine what clients can book and who delivers these services.
Add services with duration and pricing
Well-defined services are the foundations of any booking system. Start by adding each service your business provides:
- Direct yourself to the Services section of your booking plugin
- Click on “Add New Service” or similar button
- Add a descriptive service name and detailed description
- Set the default duration and price
Most plugins give you custom duration options. Customers can choose different time lengths for the same service with this feature.

Custom durations give you pricing flexibility, too. You might set $250 for a 30-minute session and $300 for sessions over 2 hours. Clients often book longer sessions with this tiered pricing model because they see better value.
Assign employees to services
Linking services to your team members is the next vital step. Here’s a quick guide to assign staff:
The “Employees” or “Staff” section in most booking plugins lets you add team members. Each employee needs basic information like name, email, and you can add a photo and phone number if needed.
Link employees to specific services they’ll provide after creating their profiles. Your booking system needs this connection to work properly. At least one employee must be assigned to service appointments in many plugins.
You can set different prices for each employee. Some staff members might charge more due to their experience or specialization. Just edit their assigned services and adjust the pricing. Businesses with tiered service levels find this feature particularly useful.
Different plugins handle employee assignment differently. Simply Schedule Appointments gives you several options:
- User Preference: Clients pick their preferred staff member
- Any: Book with any available team member
- Random: Appointments get distributed randomly
- Round Robin: Appointments are distributed equally
Set individual staff availability
Staff scheduling might be the trickiest part of setting up your booking system. Each team member needs their own availability settings to avoid scheduling conflicts.

You can set specific work hours for each employee in most booking systems. Different schedules for each day of the week and breaks between appointments are possible. This detailed setup ensures clients only see time slots that are actually available.
The system also lets you manage:
- Special days: Unique hours for specific dates or ranges
- Holidays: Blocked dates when staff can’t work
- Buffer times: Extra time between appointments for preparation
Step 4: Customize and Style the Booking Form
Your booking form’s design creates a professional impression that aligns with your brand identity. The visual elements and customizations directly affect how customers engage with your booking process.
Adjust colors, fonts, and layout
WordPress booking plugins give you many ways to customize how your forms look. You can match your brand’s colors, change backgrounds, and pick text colors that work well together. These changes help visitors navigate smoothly through your site.
The fonts you choose affect readability and brand consistency. Plugins let you pick from Google Fonts or system fonts. To cite an instance, Simply Schedule Appointments uses Roboto by default, but you can change this setting easily.
Smart layout choices make your booking form work better. The drag-and-drop feature lets you move fields up or down to create a logical flow.
Add custom fields and branding
Custom fields are a great way to get specific information for your business. Here are common field types:
- Text inputs (single-line and multi-line)
- Checkboxes and radio buttons
- Dropdown menus
- Date and time pickers
- Phone number fields
Each field comes with its own settings. You can add helper text, set default values, and choose required or optional fields. These custom fields show up below the basic fields like name, email and phone, giving you valuable details about each appointment.
Businesses that need compliance features can use HTML-supported fields to add clickable links to terms and conditions. Custom instructions help guide your customers through booking smoothly.
Preview the form before publishing
Testing your form’s look and function matters before going live. Most booking plugins show you exactly how your form will look to customers. This helps catch any issues early.

Preview mode shows your form as users will see it. You can spot problems with layouts, colors, or field arrangements quickly. It also helps verify that your messages make sense in the full form’s context.
Step 5: Embed the Booking Form on Your Website
Let’s get to the exciting part, adding your booking form where your visitors can use it. You’ve designed and configured your form, and now it’s time to make it available on your WordPress site.
Using shortcodes or blocks
Adding your booking form is simple with shortcodes, small code snippets that WordPress turns into your complete booking form. Most booking plugins create these automatically. Just copy the shortcode (looks like [booking_form]) from your plugin’s settings.
If you use Gutenberg, many booking plugins offer their own blocks. Click the “+” icon in your editor, search for your plugin’s name, and pick the right block.
Add to pages, posts, or widgets
Your booking form can go in several places:
- Pages: Ideal for dedicated booking pages
- Posts: Useful for event-specific bookings
- Widgets: Perfect for sidebar or footer placement
Test the form on desktop and mobile
Take time to test your booking form on different devices before going live. Check your page on both desktop and mobile to make sure layouts, fonts, and spacing are available. Modern WordPress booking forms use a responsive design that fits any screen size, but testing will give you the full picture.

A well-placed, available booking form makes it easier for website visitors to become confirmed appointments.
Conclusion
A booking system on your WordPress site changes how you manage appointments and reservations. The process takes just five steps and provides a clear path forward. You start by picking a plugin that fits your needs. Set up your business details next. Add your services and staff members after that. Match your booking form to your brand’s look. The final step involves placing the form strategically on your site.
This setup offers advantages that go way beyond simple convenience. Your business can take bookings 24/7, and clients schedule appointments whenever they want. You save 1-2 hours each day by cutting out manual scheduling work. The system’s automatic reminders reduce no-shows by up to 30%.
Bookeo emerges as a standout WordPress scheduling solution that handles these requirements perfectly. This complete system accepts bookings all day while stopping double-bookings and calendar conflicts. Clients see your availability, pick services, and pay through a user-friendly interface that works on any device.

Your booking system creates the first impression for many potential clients. A smooth, professional booking experience shapes your client’s entire relationship with you. By doing this and selecting a robust appointment scheduling tool like Bookeo, you’ll build an appointment system that saves time, cuts down on admin work, and gets more bookings.
Gone are the days of managing appointments through endless calls and emails. Your WordPress site now handles the booking process automatically. This lets you concentrate on what matters most – giving your clients exceptional service. Set up your booking system today and see your business efficiency improve dramatically.