How to Add Scheduling to Website on GoDaddy
The majority of customers will abandon their purchase if they have to spend more than 5 minutes booking an appointment.
Poor scheduling can hurt any service business that relies on client appointments, and if you don’t make it easy for customers to book appointments with you, they’re likely to go to your competitors.
Integrating online scheduling functionality into your website is the solution to this challenge, allowing you to accept online bookings 24/7 without having to build the functionality from scratch. For any business that relies on client appointments, online scheduling is a necessity.

Is your business using a GoDaddy website? How can you integrate this online scheduling functionality? You’ve come to the right place.
In this article, we’ll discuss how to seamlessly integrate online scheduling into your GoDaddy website. We’ll cover a step–by–step guide on how to enable online booking on your GoDaddy website, from how to choose the right online scheduling solution to preparing your GoDaddy website (if you haven’t already) to measuring and fine-tuning.
By the end of this article, you’ll have a solid knowledge of how to set up a GoDaddy website for your business, complete with reliable 24/7 online booking capabilities.
Let us begin this journey right away!
Does Your GoDaddy Business Really Need Online Scheduling?
According to a recent study, 60% of Americans now prefer to book appointments online.
More and more people are realizing the convenience and flexibility of booking appointments online from anywhere and with any device.

Online scheduling can offer a variety of benefits for all types of businesses of all sizes, especially those that rely on client appointments.
These benefits include:
- Time and resource efficiency: With online scheduling, your business can save a lot of time and resources. Online scheduling streamlines and automates the booking process, reducing the number of phone calls and emails your staff would otherwise need to handle. This allows your staff the time to focus on more useful tasks, such as providing excellent customer service.
- Lower no-shows and errors: The automation of online scheduling reduces the possibility of human errors like double bookings. On the other hand, online scheduling solutions can send automated SMS/email reminders to clients, which has been proven to lower no-shows.
- Improved customer satisfaction: The ease of use and 24/7 availability of online bookings provide clients with convenience and more control over their appointment booking process. This often leads to higher customer satisfaction levels, and customers are more likely to do repeat business. Loyal customers may also help promote your services to their friends and colleagues.
In short, online scheduling is a valuable tool that can help businesses of all sizes increase their sales and improve customer satisfaction. 24/7 online scheduling works for your business even when you—or your staff—are not working.
So, if your business relies on client appointments, online scheduling is simply a must.
Choosing the Right Scheduling Solutions
While there is the option of building an online scheduling function from scratch, the most cost-effective and accessible option to add scheduling to your GoDaddy website is to integrate a ready-made scheduling solution.
Yet, with so many different options available on the market, choosing the right one for your business will be an important task. Changing to another solution mid-way will be a challenging and potentially expensive process, so you should treat it as a long-term investment.

With that being said, before committing to an online scheduling solution, it’s best to assess your business’s unique needs first, especially the following factors:
- Type of appointments: Will you only be offering one-on-one appointments or other types like group appointments, recurring appointments, etc?
- Number of appointments: How many appointments do you usually get each day, week, or month?
- Staff availability: The number of staff members you have and their available hours.
- Complexity: For example, if you are offering multiple service providers (i.e., multiple doctors in medical practice), you’ll have more scheduling challenges than simpler businesses.
- Scalability: Consider your business’s growth potential and look for a scheduling solution that can accommodate more clients, services, and staff as you grow.
With that being said, Bookeo is a great and versatile online appointment scheduling solution that can cater to most businesses of all sizes and types.
Bookeo offers numerous advantages and a robust set of features, including:
- Ease of use: Bookeo features an intuitive interface and workflow that are easy to use for both your staff and customers/clients. With Bookeo, businesses can create and manage schedules easily, while clients can book their appointments in just a few clicks.
- Flexible: Bookeo is a versatile solution that offers a variety of tools and options to meet the needs of different types of businesses. With Bookeo, you can book various types of services, from one-on-one appointments to group appointments to courses, etc.
- Scalable: Bookeo can grow together with your business.
- Cost-effective: Bookeo offers a number of pricing plans to meet the specific needs of different sizes of businesses to ensure cost-effectiveness.
- Customer support: Bookeo offers reliable 24/7 customer support. If your business needs any help, Bookeo will answer any questions you may have.
Preparing Your GoDaddy Website
Now that you’ve chosen a scheduling solution for your website, the next thing to do is to prepare your GoDaddy website.
Here’s a quick rundown;
-
- Ensure that your GoDaddy account is active: Just in case you don’t have a GoDaddy account yet, create one. Make sure to verify your account information by clicking on the “Verify Your Account” link in the email you’ve received from GoDaddy.
- Domain name: If you don’t have a domain name yet, you can register one on GoDaddy (GoDaddy offers domain registration services). Your domain name should be the same as your brand name, but if that isn’t possible, choose one that is easy to pronounce/remember and reflects your business. If you purchased your domain separately, make sure it’s connected to your GoDaddy’s hosting account. Contact GoDaddy’s support if you need assistance.

- Web hosting: You’ll also need a web hosting plan from GoDaddy. You can use a third-party hosting plan, but consistency will streamline the registration process.
- WordPress Compatibility: If your website is WordPress-based, make sure you’ve updated it to the latest version of WordPress. Also, Bookeo offers a WordPress scheduling plugin for a more streamlined integration.
- SSL Certificate: Verify that your website has an active SSL certificate (using HTTPS instead of HTTP), which is essential for protecting client data during the booking process.
Integrating Scheduling Solution To Your GoDaddy Website: Step-by-Step
For this section, we are going to use Bookeo as our chosen scheduling solution.
Integrating Bookeo into your GoDaddy website is relatively easy, and you can follow these step-by-step instructions:
Step 1: Sign up for your Bookeo account
If you don’t already have a Bookeo account, you can sign up for a free trial by going to Bookeo’s website and clicking the “Free Trial” button in the top right corner.
Once you’ve set up your services and other settings, go to the next step.
Step 2: Connect your Bookeo account to your GoDaddy website
Once you have signed up for a Bookeo account (free trial or otherwise), you can then connect this account to your GoDaddy website.
To do this, go to your Bookeo account and then go to the “Settings” tab. Then, click on “Website Integration”.
Then, choose “Embed a widget in my website” (look at number 1 in the image below)
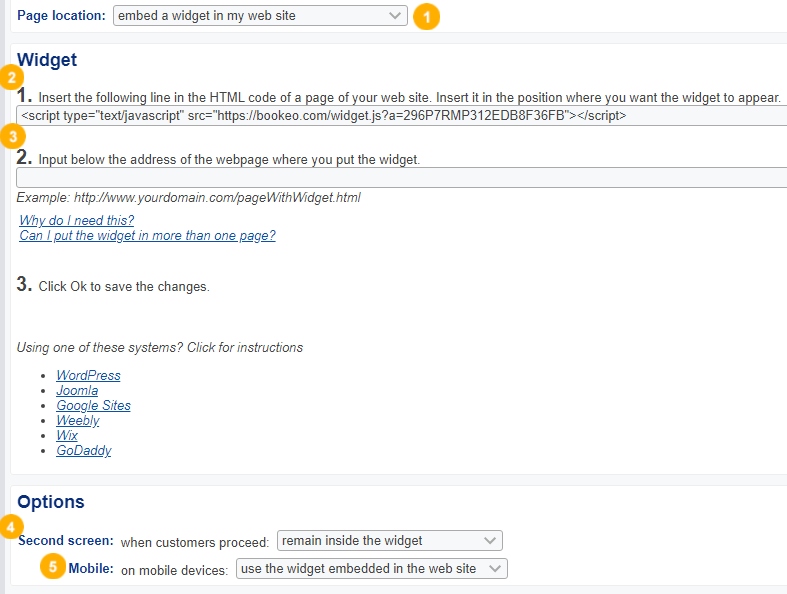
Insert the provided HTML code on your GoDaddy website (number 2 on the image.)
In the “Options” section (from the “Second Screen”, number 4) dropdown menu, you can choose between the two options:
- remain inside the widget, or
- open a separate full-screen page
On the “Mobile” dropdown menu, still in the “Options” section (number 5), you can choose between.
- use the widget embedded in the website
- enlarge the widget to full screen
Once you’ve configured everything, leave this browser window open and then open a new tab in your browser.
Step 3: Set up the integration in your GoDaddy website
You can embed Bookeo widget either in the GoDaddy Websites + Marketing plan or with the old GoDaddy website builder. Unfortunately, the GoDaddy Go Central website builder doesn’t allow you to integrate Bookeo directly. Yet, you can redirect your visitors to your Bookeo booking page.
The steps below are for GoDaddy Websites + Marketing plan. We’ll explain how to integrate Bookeo into the old GoDaddy website builder further below.
GoDaddy Websites + Marketing
Log in as admin to your GoDaddy account, and you can either create a new page or go to your booking page.
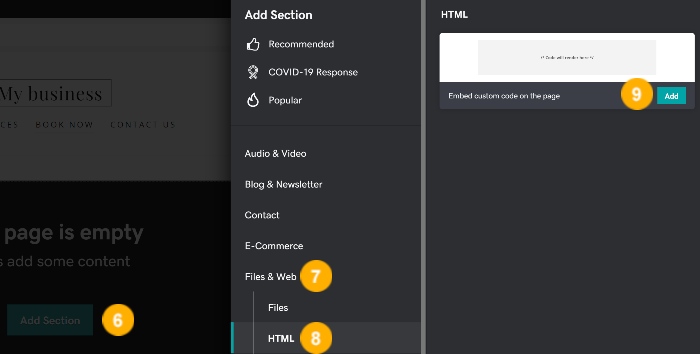
Click on the “Add Section” [6] button, select “Files and Web”[7], then HTML”[8], then click on the “Add” [9] button.
A code will be shown on the next page (see number 10), then in the “Custom Code” section (number 11), paste the widget HTML code you’ve copied before (see Step 2.)
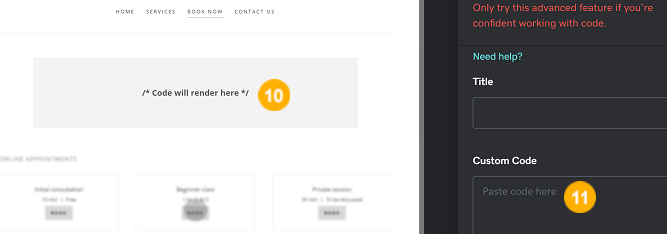
Click “Done” and when you’re sure everything’s good to go, click “Publish”
Step 4: Set up the booking page URL
Go back to your Bookeo tab, and make sure you’re still on the “Settings-> Website integration” tab.
In the “Widget” section, paste the URL of the webpage where you’ve put the widget (see Step 2, number 3 on the image.)
Voilà! Your Bookeo booking page is good to go.
GoDaddy Go Central
If you are using the GoDaddy Go Central, you can add a “BOOK” button and redirect customers to the Bookeo booking page you’ve just set up. In Bookeo, you can go to “Marketing->Booking button and links” to find buttons and links you can use.
GoDaddy’s old website builder
You can follow the same steps above to set up the Bookeo integration. Then, you can follow these instructions:
- Login to your GoDaddy account as admin, and you can either create a new page or go to your existing booking page.
- In the “Main Navigation” section, click on the “HTML Code” button. It will open the HTML section on your page.

- Click in the HTML box, then the “Settings” icon.
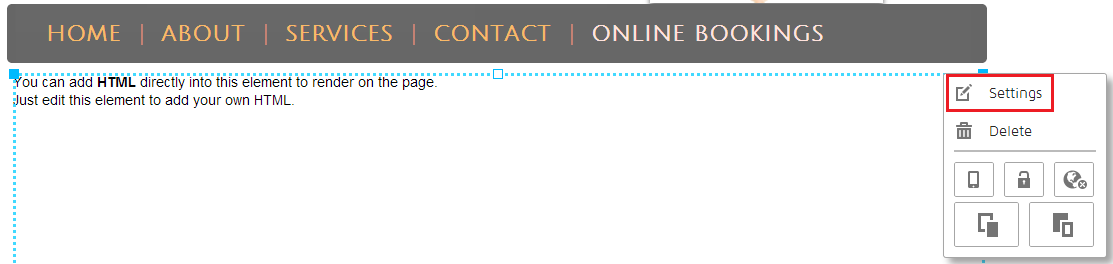
- Paste the widget code (see the instructions for GoDaddy Website + Marketing above.)
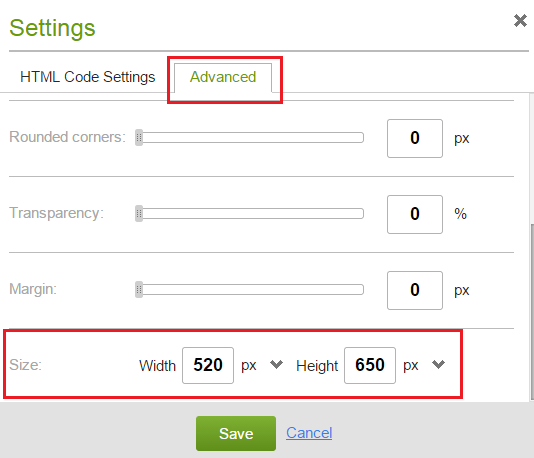
- Resize the HTML section as you see fit by clicking on the “Advanced” tab, then input the desired size in the “Size” section.
Then, simply go back to your Bookeo account and paste the URL of the GoDaddy webpage where you’ve put the widget, and click “Save.”
Optimizing the User Experience
After following the instructions above, your Bookeo scheduling function has been properly integrated with your GoDaddy website.
The next thing you should do is to configure the Bookeo system to optimize the user experience:
Adjusting booking options and availability
Bookeo allows you to easily adjust your availability and booking options: which services are available to book online, the times your clients can book, how far in advance they can book, etc.
Regularly review and update your staff availability, available services, and service prices.
Branding and design for your booking page
One of the key benefits of using Bookeo is its customizability: you can customize the design of your booking widgets to reflect your brand identity and tone. You can add your own logo and change the color palette, fonts, and other elements of the booking widget to match your website and your brand.

Take the time to customize the booking page’s design as you see fit.
Testing the New Scheduling System
By now, you’ve integrated your online scheduling solution, and it should be ready to go.
Yet, before launching it to the public, it’s best to thoroughly test the newly integrated system to make sure everything is running smoothly.
Conducting a trial run
To conduct a trial run, simply book a test appointment with yourself:
- Start by navigating your own website. Locate the scheduling page or widget. Review whether it is easy and prominent enough to find.
- Impersonate the actions of a real customer/client by selecting a service, service provider (if any), date, time, and other details.
- Go through the entire booking process (including providing customer information.) And try confirming the appointment.
- Try to cancel the appointment and reschedule it.
Consider asking your team members, friends, or even a select group of customers to try the scheduling process, so they can provide their feedback. Fine-tune the scheduling options based on the feedback.
If you encounter any issues during the test run, consult the support documentation of the scheduling solution, or reach out to their customer support for assistance.
Closing Thoughts
In conclusion, to add scheduling on your website on GoDaddy, you can follow the following steps:
- Choose and sign up for an online scheduling service
- Connect the online scheduling service to your GoDaddy website, follow the solution’s instructions
- Create a booking page
- Customize the booking page, add accurate information
- Publish the scheduling widget/page
Voilà! By following these relatively simple steps, your customers are now able to book appointments with your business directly on your website on GoDaddy.
Enabling 24/7 online booking and scheduling won’t only save your business’s time and resources, but will also improve customer satisfaction and loyalty. In today’s digital age, a streamlined booking process can literally make or break the success of a service business.